6.28.2010

A new addition

A new team member joined us last night!

He has had quite a journey over the past few weeks ... from Georgia to New Jersey.

We are still in search of a name (suggestions are welcome).

Now time to find a doggie tool belt and to teach him to stay for photo ops.

Photobucket

Photobucket

Photobucket

Photobucket

Photobucket

Photobucket

Photobucket

6.24.2010

Upstairs bedroom progress

Or should I say "not-so-much" progress...

So here's my list of excuses:
  1. We've been busy with other things.
  2. MDF is such a pain to pick up at the store since you need to find willing parent and time to borrow their truck.
  3. It's really really hot outside which makes the upstairs really hot.
  4. We need a couple hour block of day light to work on the molding.
  5. I need to pick more wall paint for touch-ups. I thought I would be good with left over paint, but I'm really bad a sealing cans. We do have a small sample in a semi-gloss but our walls are painted with a matte.
  6. We are also painting the basement floor.
  7. We like to watch tv.
Most of the molding is up (painted and caulked).


We got the bed upstairs and assembled without ending our 11 year relationship.


The solid wood dresser made it upstairs too.


Of course some of the shoes found a temporary home (more on this later).


Can't wait to wrap this project up and add 300+ square feet of living space to our home.

6.21.2010

Happy Dad's Day

Hope all of the dads out there had a rockin' cool day.

1984 Watkins Glen, NY
Watkins Glen, NY 1984

6.16.2010

It's the new black

Over the weekend, I was with a friend at an awesome antiques market way out in PA. After looking at some costume jewelry booths and seeing a recurring trend in our choices, we declared neon as the new black. You know if you say it out loud it makes it true!

Here's some of my favorite neon...
Cameo by hhop
Cameo by etsy seller, hhop

Stay Classy Pencil 6 pack by Earmark

Home Décor Love Twill Trumpet Flowers Pink
Home Décor Love Twill Trumpet Flowers Pink by Amy Butler at Fabric.com

Sunshine and Shadow Silk tie-dye short scarf
Sunshine and Shadow Silk tie-dye short scarf at Outnet.com
Daphne Coffee Table Teal Blue by Johnny Egg
Buffalo Tools  Neon Screwdriver Set
Buffalo Tools Neon Screwdriver Set

CC SKYE Neon Screw Bracelets

CC SKYE Neon Screw Bracelet at Zappos.com

Touch of neon
via Peacock Feathers

What would you like to declare as the new black?

6.11.2010

Lonny Magazine: Eye Candy

images via Lonny Mag


Check out more eye candy here. Have a happy weekend!

6.09.2010

I'm dreaming of a new bathroom...

Here's what I'm dreaming up for my downstairs bathroom. Hopefully it will come to fruition by the end of 2010...or 2011.

For some of the smaller updates (like a new medicine cabinet), I'm hoping to sneak in between other house projects. Let's hope that the Dude doesn't catch on to my plans.

6.07.2010

Out with the old, in with the new

Yesterday, we celebrated our "5 year owning our house" anniversary by putting in some new lights in the downstairs bathroom. Since this bathroom is way low on the list of remodeling projects, I figured by adding some new lights and doing some small projects in there will make the space more tolerable.

Old lights...

Old light in downstairs bathroom

(sorry for the poor iPhone photo quality...I really need to get a new camera!)


New lights...

New lights in downstairs bathrrom

6.03.2010

Refinishing the floors: Part 3

Here's some fun (yeah, right) tips for refinishing hardwood floors that we learned along the way:

  • get a good mask: We wore crappy masks and interesting things were coming out of our nose (what, too much info?).
  • get ear plugs: Yeah, we didn't wear ear protection and our ears were ringing for quite some time. That edge sander is really loud when using in a room without furniture.
  • clean as you go: I'm a "clean as you go" person. Since our upstairs has a dutch door at the bottom of the stairs, we did not have any wood dust downstairs. I did keep a broom and bucket upstairs to sweep up as we were working. The only things I've had to clean up so far are the upstairs windows and moldings. Not too bad. We also emptied the drum sander bag frequently and used the shop vac to clean the sander about every hour.
  • tape up everything: We taped up the built-in cabinets but forgot to tape up our fake return duct. The upstairs return duct is actually our attic/bathroom fan. Last night, the Dude shop vac'd (is that a verb?) it out because we were afraid we would set the house on fire by a wood dust spark.
  • timing: You might consider sanding your floors before you move into your house with all of your junk things and not picking a weekend with the temperature in the 90s (which meant the upstairs was in the triple digits). We failed on both parts.
  • prep work: Prepping the room or for any project is the suckiest part of the job. You really need to take some time getting everything prepared for sanding and putting down poly. If you take a short cut, it will show or you have a chance to set your house on fire by not removing all of those stupid staples in the floor from the carpet. We also thought we could get away with not sanding between coats of poly. In between the first two coats we did not sand but then started after that since the floors did not feel that smooth.
  • low expectations: We had very low expectations going into the project. Originally we thought the boards would be in horrible condition and I was already mentally preparing to paint the floor. Also, it's an old house...we knew the floors would not look like the fancy new mcmansion.
  • vacation: Okay, this part is lame. But we treated this project like we were on some wacky three day vacation. We forgot to go food shopping prior to starting and was "forced" to eat out for most meals. We also treated our self to ice cream every night as a reward. Also, the Dude had to use my bathroom since his was the one upstairs housing a tv, a tv stand and shoe storage units. He mentioned that using my bathroom was like he was staying at a hotel. I know, what ever works...

Hope our mis-steps help you on your hardwood floor project.

Since this post is a bit long, I'll put something together with the budget and timeline a little later.

6.02.2010

Refinishing the floors: Part 2

After all of the prep and sanding, we were finally ready to poly the floors on Sunday night. We chose a water-based polyurethane in a semi-gloss from Behr. I wanted to use a water-based poly because it dried quickly and did not really have much of an odor.

Unfortunately....the tool rental guy that we purchased the poly from was not aware that 1. it was the last gallon at their Home Depot and 2. the reason it was their last gallon...because the product was being discontinued. We did not realize issue one or two until we needed another gallon the next day.

The poly was put down with a lambswool pad. We thought we could get away with not sanding and re-cleaning the floors between coats, but after the second coat we realized we really should sand. While the Dude was out looking for more poly, I went to our local Ace Hardware to get the sand paper, sandpaper pad attachment, a scraper for the corners (the edge sander could not get in the corners) and a microfiber cloth.

The Dude secured two more gallons (one extra for "just in case") and we put down two more coats with sanding in between.

Now we have to wait 72 hours after the last coat for the floors to cure. Ugh, I can't wait to get the room and house back in order!!

Sorry for the crappy iPhone pictures...

Photobucket

Photobucket

Photobucket

Photobucket

Photobucket

Photobucket

The next post will be lessons learned and other fun tips! Wheee!

6.01.2010

Refinishing the floors: Part 1

Over the long weekend, we decided to finally tackle the floors upstairs. Our upstairs is a 330 square feet finished attic space (plus a full bathroom) in a cape cod-style bungalow. We started pulling up some of the carpet in January (wow, time flies!).

When I got home from work on Friday, I started taking everything downstairs and created a crazy "Hoarders" look on the main floor. That night we continued to pull up more carpet, staples, tack strips and molding. We gave up that night with the bed area because we were dreading taking apart the bed and removing the mattress.

Prepping floor

Saturday morning we pulled up the last of the carpet and took apart the bed and removed the rest of the items. We attempted to shove the mattress down the steps but it was not working out how we planned. I have no idea how we got the mattress upstairs in the first place. In the end we covered the mattress up and left it upstairs on the staircase half wall.

Getting ready to sand

Around 3:30pm we arrived at Home Depot rental and picked up a drum sander with all of the expensive sand paper (in the end, we were able to return 8 unused sand paper rolls). By 4pm - we were sanding.

Since we started off the project with very low expectations, we were happy with just the first pass of the sander. As you can see, our 80-90 year old floors were never finished but had tons of drywall mud and paint from a previous remodel in the early 1990s.

First pass with sander

Steve sanding bed area

The floor boards did not have too many surprises. We filled a large section of one board (above) with wood filler. We knew it would not look like the other boards, but since we already had lowered expectations, we just described it as "character."

First passes of sander before and after

Bed area being sanded

Steve Sanding built in area 2

We sanded until 9pm on Saturday and started back up around 10am on Sunday morning. By 1:30pm we were back at Home Depot to return the drum sander and to rent the edger sander. We thought we could get away with not using the edge sander and just use our hand sander and cover the edges up with molding. But...fail. The edge sander was really necessary and we were able to finish the edges within 45 minutes.
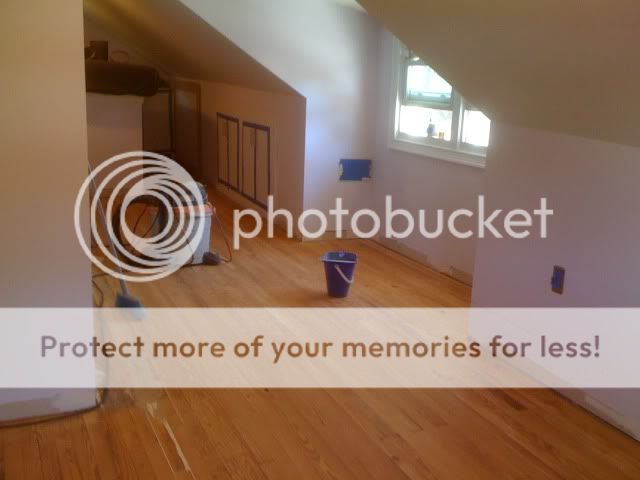
Sanded floors

Tomorrow's post will be our poly adventure!!